But, it's the best way I could describe it. You know when you don't have a scanner and you have some cool hand-drawn graphics you want to use but can't because of this fact?
Well, my tutorial might be just the right for you! :)
That's what I did for this tutorial, now i'm using this picture instead of the usual written "have a nice day! :)" at the end of each post! :)
What you need:
- Paper
- Pencil
- Black Pen
- Eraser
- Somewhat Good Camera
1. Draw a design onto white paper with pencil, if you don't already have one. If you're not sure what kind of design you want, try various drawings first.
2. Once you're satisfied with your choice, trace over this design with black pen (if you're not going for the sketchy pencil look).
3. Erase pencil marks beneath your pen drawing. But make sure the ink has dried already, or the design will get a bit smudged! (and it's gold nail polish on my nails that looks weird in this photo) :)
4. If you did got a bit of smudged parts, don't worry - these won't be seen afterwards/you can also remove them later.
5. Carefully trace over some bits again, if those are like this.
6. Photograph your finished design, as you can see, my picture is kind of grey-ish/dark, but it doesn't matter as I edited it and it was black and white anyways (if you plan some colors in your drawing, you can fill those in on the computer!).
9. Click adjustment button at the bottom. You will see various options there.
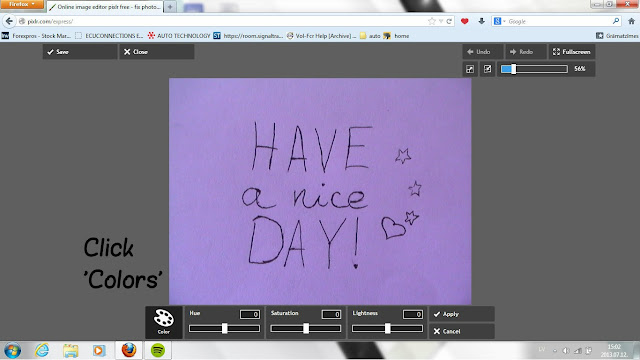
10. Choose 'colors'. You will see 3 options to play with there.
11. I wanted my design to be monochrome, so it's easier to edit. What I did was set saturation to '-100'. Once you click 'apply', you will be taken back to the adjustment menu. (If you don't want to change anything, click 'cancel' and you will be taken back also).
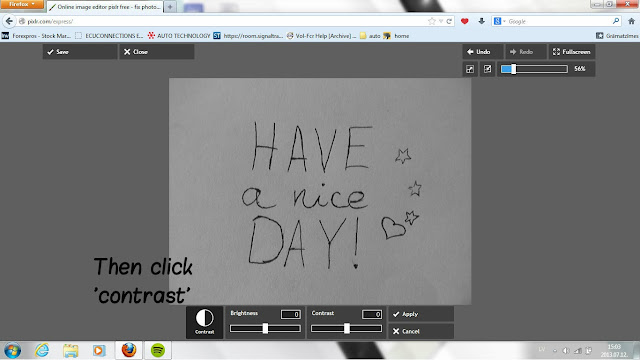
12. Now click 'contrast'. You will have 2 options here - 'brightness' and 'contrast'.
13. As you can see, I set my contrast to full and the brightness only a bit. You have to see for yourself what looks nicer - you need the background to be as light as possible and the drawing itself must be as dark as possible. Play around with those and see what works better!
14. I also clicked 'sharpen' tool, which works automatically, it made my letters darker!
15. Save your picture and return to the start menu, then open Pixlr editor. It's more advanced, but I'll show what I did there, maybe you won't even need it!
16. This is how your picture will look like on Pixlr advanced editor. Pretty much like some kind of photo editing program!
17. I choosed erase tool to erase any mistakes. I removed the little heart, because it seemed unneccesary, you can also remove any smudge marks I talked about earlier, if you still have them here after the brightness and contrast bit.
18. Using 'selection' tool you can move around parts of your design, if you have any! I decided to move those stars around, so they look nicer. Click the tool, and select an object.
19. Then right-click to open a drop down menu and select 'free transform'.
20. Now you can move around objects in your picture!
21. When you have placed the object where you want, click somewhere (on the grey area, for example), and a window will pop up. Click 'yes'. Yēs. :)
22. If you want to fill in some parts with color, choose 'bucket' tool, and then click on that large color bit to open up a color changing menu.
23. You can also choose colors from 'RGB', 'WEB' or 'IMG' (image) at the top of the menu. When you're ok, click 'ok'!
24. Then fill in the places you want. Just make sure that all the drawing lines are connected, so the colors don't go everywhere (pretty much like in Paint)! If some lines aren't connected, choose pencil tool, change color back to black, magnify the picture (on the top right corner) and connect them! You are also able to choose the type of the pencil, thickness and everything there (didn't picture that, sorry)!
25. Save your picture and you're done! :) Use your picture wherever you want! :)
You could also do your signature and put it somewhere! The possibilities are endless! :)


No comments:
Post a Comment